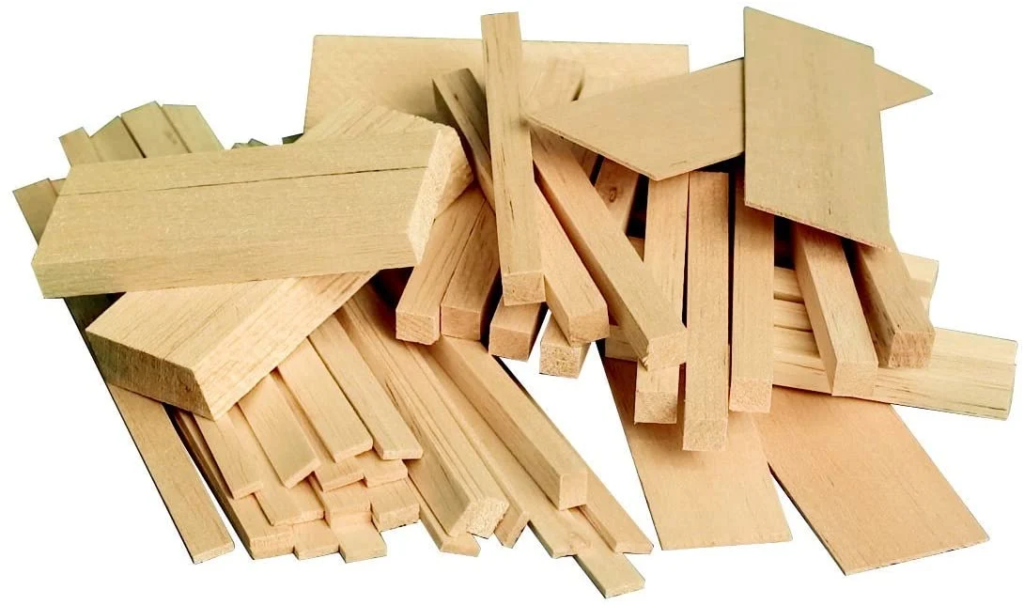
One of the questions that most people working with balsa wood is “Can you varnish balsa wood?” Balsa is one of the most popular woods used to make miniature projects and model crafts. Its lightweight properties and impressive beauty make it the wood of choice for making model airplanes and dollhouse furniture.
Part of using balsa wood is the challenges in working with this material. This wood is very porous and thus, cutting it will almost always result in fuzzing and uneven edges. In some cases, cutting the wood without careful preparation can lead to breaking and ruining your material.
Finishing is another problem in wood with large pores. The finishing product such as stains, varnish, and paint will be absorbed by the wood. This will lead to clumping and discoloration on the applied area. So before we go to the ways to varnish balsa and the products you can use, let’s first get to know more about balsa wood, especially its characteristics, uses, and applications.
What is Balsa Wood?
Balsa is a famous wood used for lightweight projects and models. It is wood from the balsa tree or Ochroma pyramidale, a huge tree that grows very fast. This tree is native to the Americas but it is also available from many plantations all over the world.
Balsa is Spanish for raft. As a tree, it can grow up to 30 meters tall. It is classified as a hardwood tree despite being very soft. It is the softest hardwood manufactured commercially because it is very lightweight.
Of all the nations that grow balsa wood, Ecuador is the largest supplier growing up to 95% of the balsa wood in the world. However, recent growing activities of balsa have led to 60% of the wood grown in plantations.
Balsa plantations are densely-packed with 1000 trees for every hectare. This is in comparison to nature with only three trees per hectare. These plantation trees are harvested after growing into huge trees in just 6 to 10 years.
Characteristics of Balsa Wood
Balsa wood is soft and light with an open grain with a coarse texture. The balsa wood density ranges from 40 to 340 kg/m3 and a typical density of 160 kg/m3. Balsa wood is the softest lumber ever measured by the Janka hardness test at 22 to 167 pounds-feet.
Balsa wood from a living tree has very large pores filled with water. This creates a very spongy texture which has made the wood of the tree very light and barely capable of floating. When commercially produced, the wood is dried using a kiln for two weeks to remove all the water inside the cells. Kiln drying will leave these cells empty.
There is an increased volume-to-surface ratio after kiln-drying. The empty cells produce a large strength-to-weight ratio as they become filled with air. Compared to naturally rotting wood, the cells of kiln-dried balsa wood keep their strength as their fibers contain lignin and cellulose.
Summary of Balsa Wood Characteristics
- Scientific Name: Ochroma pyramidale
- Distribution: Balsa wood is naturally from the tropical regions of the Americas. This tree is also widely grown in plantations.
- Tree Dimensions: 60 to 90 feet high and 3 to 4 feet wide
- Average Dried Weight: 9 pounds per cubic feet
- Specific Gravity: .12, .15
- Janka Hardness: 67 pounds-feet
- Appearance: Balsa wood has a pale red-brown grain heartwood but this is not visible in commercial balsa lumber. Almost all balsa boards and blocks are harvested from the tree’s sapwood. This is white to off-white to tan but sometimes has pink to yellow colors.
- Grain or Texture: Balsa wood has a straight grain and a moderate to coarse texture. This wood has a minimal natural shine.
- Endgrain: Balsa wood end grain is diffuse and porous. There are large pores with an irregular arrangement. There are intact growth rings with rays that are visible to the naked eye.
- Resistance to Rotting: Balsa wood has perishable sapwood. This is very susceptible to molds, rotting, moisture, and insect attacks.
- Odor: Balsa wood does not have a specific odor or smell.
- Toxicity: Some people have reported skin irritation while working with balsa wood.
- Availability: Balsa wood is available in varying degrees of quality. High-quality balsa has a very low density and is very expensive when bought at hobby outlets and specialty stores. Meanwhile, larger balsa boards and lumber are available from hardwood dealers. These woods are very hard to come by and are very expensive.
Uses of Balsa Wood

Balsa wood has a low density but high strength. These qualities make it great for manufacturing light and stiff structures such as model buildings, model aircraft, and model furniture. All balsa wood grades are useful as aircraft control lines, radio-controlled aircraft, and other light toys.
Balsa is also used in making parts for full-sized aircraft. It is a component of a light wooden airplane called the Havilland Mosquito from World War II. This wood is also used for making wooden crankbaits such as Rapala lures. Balsa wood is the best wood to make sticks used as pens for calligraphy.
Many composite kinds of wood are made from balsa and are used in specialized applications. One example is the blade of wind turbines which are partly made of balsa wood. Table tennis bats have a sandwiched layer of balsa in plywood.
Balsa is also popular in making laminates with glass-reinforced plastic or fiberglass to make top-quality surfboards. Many boat decks and topsides are made of balsa wood and other types of plywood.
Another popular use of balsa is to make breakaway props for theater and movie productions. Other uses of balsa include whittling projects, picture frames, and Baroque-style decorations.
Balsa Wood Workability
Before we go to finishing balsa wood, let’s first learn about its workability. Balsa is one of the easiest woods to work with because it does not dull or affect the sharpness of cutters, blades, and saws. However, because of its very low density, roughness and fuzziness of the edges may occur especially when you’re using dull cutting tools.
Balsa wood will not hold nails and screws very well because it is very soft and porous. The best way to hold two balsa pieces together is to use wood glue. Also, glue is the best way to join balsa with other types of wood.
Balsa will stain and finish well only when you know how to apply it. This wood tends to absorb a large amount of finish or varnish during the first few applications. The varnish product will soak up the wood grain and can take a lot of time to dry. Also, there is staining that may occur after the application of varnish or stains therefore, you need to use the right product to finish balsa wood.
How to Stain Balsa Wood?
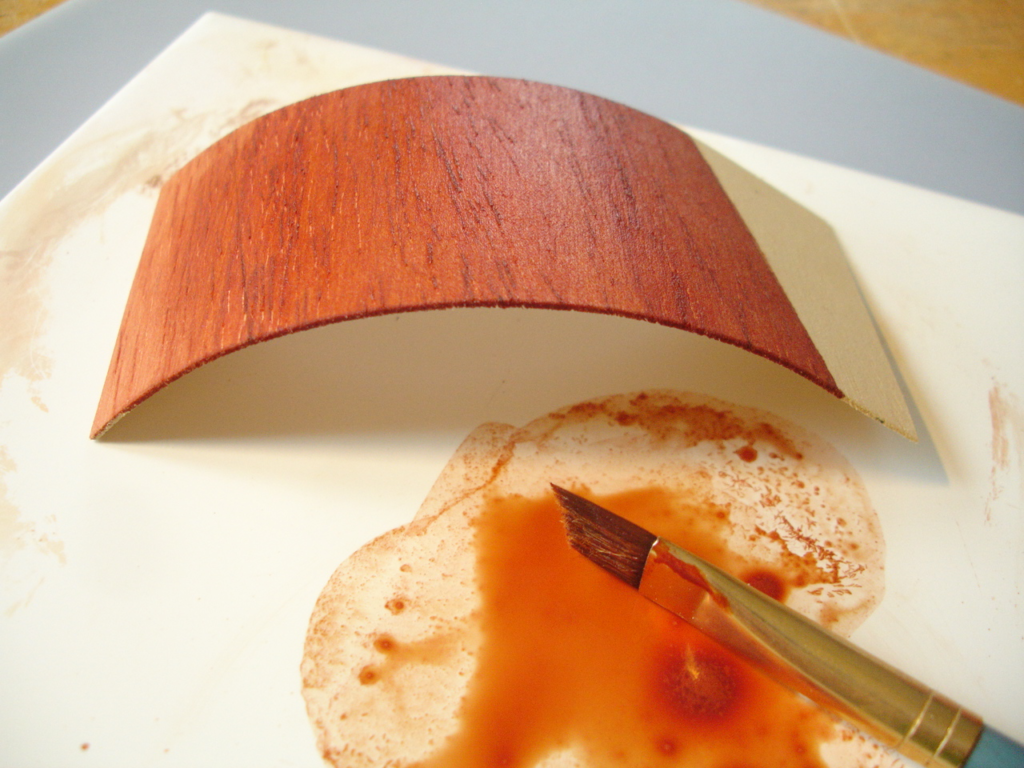
First of all, why stain balsa wood? Woodworkers sometimes stain balsa wood to create a lovely finish. Stains will highlight the wood grains and will also protect the surface from marks, scratches, and dents. There are many types of stains and are available in many colors. The right color will depend on the color of the finished product.
You can apply stain on balsa but you need to take a few more steps in finishing your project to avoid unevenness and blotchiness.
What you will need
- Balsa wood – for this tutorial, let’s start with a thin piece of balsa wood. Have at least three pieces to apply regular varnish, polyurethane varnish, and paint.
- Pre-stain wood conditioner – a pre-stain wood conditioner will seal the wood pores to even the rate of absorption across the balsa wood surface. A wood conditioner like this will penetrate the wood so you can get a uniform stain. There are many brands of pre-stain wood conditioners, check the application instructions and drying times to produce the best effects.
- Solvent-based sealers – these are wood sealers that have high VOCs, around 75% white spirit, and thus, have a strong and lasting smell. An example of a solvent-based sealer is a polyurethane sealer.
- Paint Brushes – you need three to four paintbrushes to apply finishing products on balsa.
- Wood paint –if you’re painting balsa wood instead of varnishing it, use latex or enamel paint. These are the best types of paint for balsa wood.
- Sanding sealer – you need a sanding sealer to seal the wood grain completely. It will close the wood pores permanently so you can apply polyurethane finish on balsa wood.
- Sandpaper – you need sandpaper to smooth out all uneven areas and fuzziness on balsa wood. You need sandpaper to smooth out the surface after applying the sanding sealer.
- Tack cloth – have several pieces of tack cloth ready to clean up any spills, messes, and drips. The best way to clean up varnish and paint is to wipe these off from the table or floor at once.
- Shop vac – a shop vac is handy in removing all dust and wood particles after sanding. You need a clean and dust-free area before you apply varnish or paint on balsa wood.
Instructions
Because of the lightweight property of balsa wood, you must always handle it with care. It is possible to crack or break if you apply too much pressure on the surface. Also, applying varnish, especially those with high VOCs must be done in a well-ventilated area. We recommend working on your projects in a ventilated garage or outdoors.
If you’re cutting balsa wood, please wear protective equipment such as a mask, goggles, and gloves. Always work in a well-lit area so you can inspect any imperfections in your work right away.
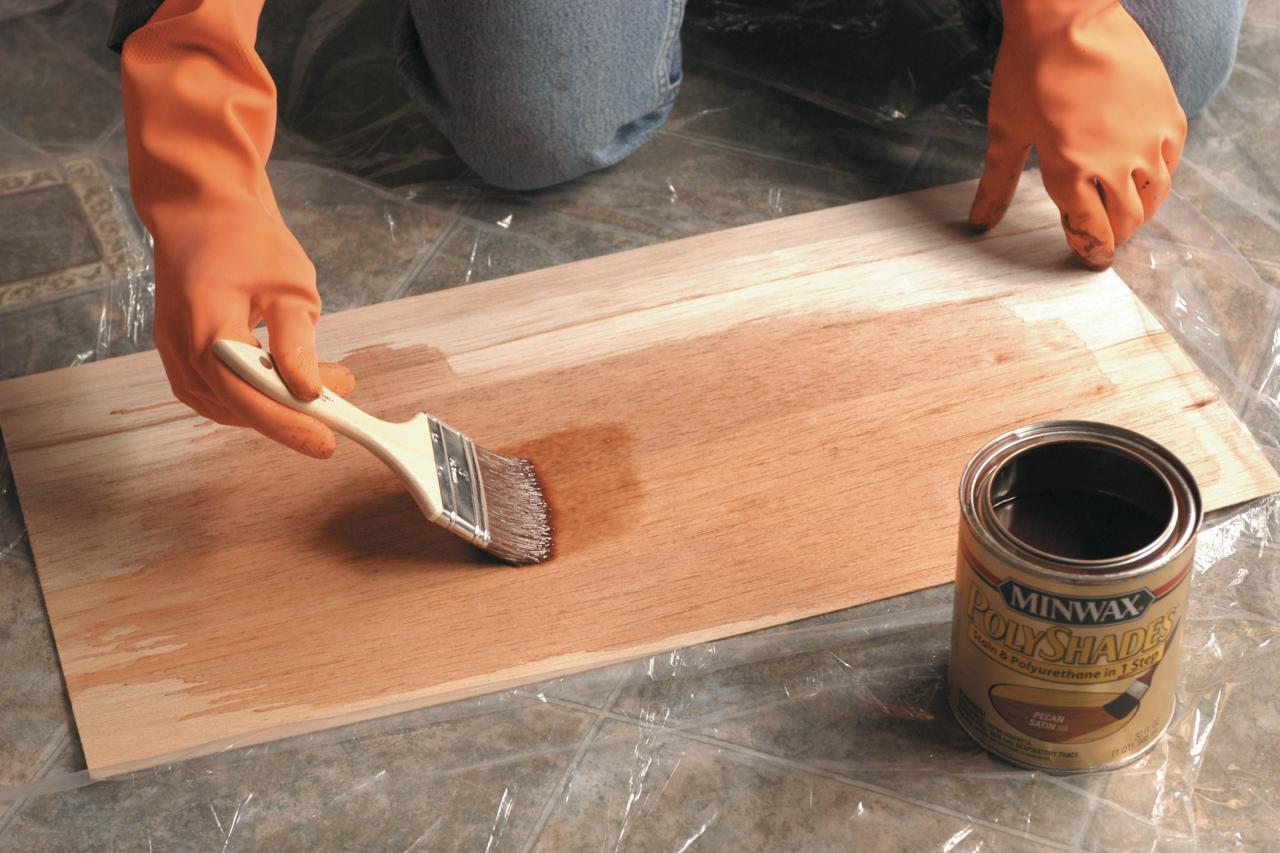
Applying Regular Varnish on Balsa Wood
- Prepare the balsa wood you will finish. Use sandpaper with 80 grit to gently remove all imperfections from uneven edges to fuzzy surfaces. You may use an emery nail file, the kind that manicurists use, to remove imperfections along holes and curves.
- Use a tack cloth to remove all dust. A shop vacuum will also help you remove all sawdust and dirt from the balsa and along the area. Do this thoroughly as even a speck of dust or sawdust can affect the final appearance of the finished balsa wood.
- Use a wood conditioner to prepare the balsa wood pores. Use a small paintbrush to apply the wood conditioner. Apply this all over the wood and make sure to follow drying times and curing times to ensure that wood has been conditioned before applying varnish.
- Let the wood conditioner dry completely. For the best effect, leave the piece to dry for at least a day.
- Apply the varnish with a paintbrush. You’ll find that the varnish will be absorbed slowly as the wood conditioner has prepped the surface well.
- Allow the varnish to dry completely. You may apply another coat of varnish if you wish.
- Sand in between coats. Use sandpaper with 320 grit to remove any dust and dirt that have settled on the surface while you’re preparing the wood. Sanding also removes any imperfections.
- Apply another coat and then dry the piece again. You now have a well-finished balsa wood piece.
Applying Polyurethane Varnish on Balsa Wood
- Prepare the balsa wood piece you want to finish. Sand the surface and the edges of the piece using sandpaper with 80 grit.
- Remove all wood dust and dirt all over the piece and the area with a tack cloth or shop vac.
- Apply the polyurethane varnish to the wood piece. You may need to reapply the varnish depending on the final appearance or color of the piece.
- Dry the polyurethane completely. Follow the drying times for the polyurethane product you’re using.
- Sand in between coats of polyurethane. Like the previous method, sanding will remove any imperfections after applying polyurethane varnish.
- Apply the final coat of polyurethane finish to the balsa.
Polyurethane varnish is not just in liquid form. This is also available in spray form. Spray polyurethane is the choice among people who are building model airplanes made of balsa wood. To apply spray polyurethane on this project, spray only a small amount to keep the wood lightweight. Avoid applying too much finish.
Applying Wood Paint on Balsa Wood
Instead of applying varnish or polyurethane on balsa, the paint will turn it into a different color. Balsa wood will not absorb the paint, not like varnish. Paint will cover the surface of the wood and create an even surface.
- Prepare the balsa wood surface for paint application. To do this, sand the surface well with grit 80 sandpaper and use an emery nail file to sand very tight areas.
- Apply a sanding sealer to seal the wood grain completely. Use a paintbrush to evenly apply the sealer. Follow the instructions on the packaging for the drying times.
- Sand the surface after the sanding sealer has dried. Wipe the surface with a tack cloth to remove all dirt and sawdust. Use a shop vac to get rid of all the dust.
- Apply the first coat of paint with a paintbrush. Let the paint dry completely for a day.
- Apply the second coat.
More Tips to Work on Balsa Wood
There’s no end to the number of projects that you can make with balsa wood. And because of this, there are many woodworking techniques derived from using balsa. Here are the most popular strategies shared by woodworkers online.
Always use a sharp blade to avoid uneven edges
You must carefully preserve balsa wood as you handle it, especially very thin balsa. To cut this wood, it would be best to use a sharp knife like an X-Acto knife or a craft knife to slowly cut away your pattern. If you don’t have these tools, you can cut balsa with a sharp paring knife or kitchen knife.
Sometimes, it’s unavoidable to get uneven edges and fuzziness as you cut balsa. You don’t have to sweat it. Just sand the rough edges or use an emery file to remove imperfections.
Never cut through the pattern the first time
When cutting balsa wood, continue to run the knife over the edge of the design. Don’t attempt to cut the wood in one go even for very thin balsa sheets. You may only crack or break the wood as you do.
Begin cutting the complicated sections of odd shapes
You’ll eventually work on difficult shapes and designs on balsa. For these, you must take your time and locate the best place to start. Always remember that aside from cutting the pattern, you still need to preserve the wood. Therefore, cut the complicated areas first using an X-Acto knife or utility knife. Once you’re done with the complicated parts, you may now start cutting simple and straight parts.
Always use an emery board or file to remove uneven edges
An emery file will be your best friend. Use this to remove all the uneven sections that a sheet of sandpaper can’t go. There are different sizes of emery board files. Have all these handy especially if you want to create more complex designs.
A dry brush is the best tool to apply finishing products
Always go for a new, dry brush when applying varnish or paint on balsa wood. A dry brush will apply stains or paints efficiently and won’t add any products to balsa that can ruin its surface.
Test on scrap balsa first
If you’re applying a new type of paint, varnish, or stain, it would be best to apply this on a scrap piece of wood first. This will test if the paint or stain will work on balsa or ruin its appearance. It would help if you researched the product first if it works well with balsa wood.
Don’t stick pins on balsa wood
Some people have a habit of using sewing pins to apply patterns over balsa wood. Although this is a common practice, you should never do this. Sticking pins will leave holes on balsa and would be hard to remove or cover. Also, you’re destroying the grain of the wood by sticking pins on it. To cover these, you need to apply a wood conditioner and finish with varnish.
Use a building board for your projects
Thin balsa sheets are great for different kinds of projects. A sturdy and flat building board will work great as a surface for your projects. You need a building board where you can work skillfully on your balsa wood builds. Keep this board clean and free from sticky glues, varnish, and paint. And, it would be best to use this building board only for your balsa projects.
Sand all imperfections
Balsa is a very rough and uneven material that’s very susceptible to breaks and scratches. You’ll likely be looking at the surface and edges every so often to check for any imperfections. And to take care of these issues, use sandpaper. Always have different fine grits of sandpaper handy along with your emery files to remove any imperfections.
Use glue sparingly
Whether you’re using wood glue or epoxy glue, use it sparingly over balsa wood. Use only a small blob of glue along the tips and check the glue drying times. A good glue to use is Elmer’s Wood Glue. It’s inexpensive and can hold balsa wood together without any issues. There are stronger glues but Elmer’s will do just fine.
Go for simple balsa models
It’s tempting to try all kinds of projects on balsa wood. But like all hobbies, it would be best to start with simple models rather than go for complicated designs for the first try. Simple models such as shapes, letters, numbers, and figures will help you build your confidence in working with balsa. You can move on to more complicated designs when you’ve finally learned the ropes of working with balsa wood.
Final Words
Balsa wood is a lightweight wood that’s typically used for light projects such as airplane models, fishing lures, model homes, and doll furniture. You can varnish balsa wood but you must be careful not to overdo it.
Apply wood conditioner on balsa wood before applying varnish. This will condition and prepare the surface and will help varnish seep slowly. Learning the techniques of how to varnish and how to work with balsa wood can help greatly in perfecting your balsa woodworking skills.
Leave a Reply