
No doubt that coffee tables serve as a vital focal point when added to any space. As such, finding the best one is a very important thing to take into consideration when it comes to planning the overall look of your interior space. While you can always purchase a ready-made coffee table, learning how to build a coffee table out of your bare hands can give you a sense of accomplishment.
Knowing how to build a coffee table through these DIY plans and guides will allow you to create a beautiful centerpiece that will not only look amazing but is also highly functional. Making your coffee table is an easy project for woodworking. With your willingness to learn and a touch of creativity, you are on your way to creating a coffee table that suits represent your taste and style!
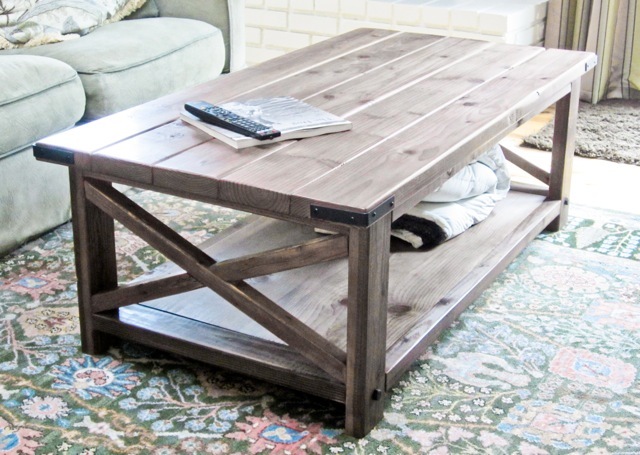
1. Rustic X Coffee Table
What You Need
- (4) 2×2 – 8 feet
- (2) 2×4 – 8 feet/stud length
- (1) 1×12 – 8 feet
- (5) 2×6 – stud length
- 1 ¼” & 2 ½” pocket hole screws
- Tape measure
- Speed square
- Pencil
- Safety glasses
- Ear protection
- Kreg jig
- Drill
- Miter saw
- Sander
- Brad nailer
- Drill bit set
Step-by-Step Instructions
Step 1 – Build the Trim Pieces and Connect
Start by building the two side trim pieces first. Then, connect the two, with the hide top pocket holes located on the top, while the bottom pocket holes on its bottom. This specific plan features a size ideal for 1×12 boards that measure 11 ¼” in width. Thus, measure your boards (1×12), double this number, cutting the side trim to fit the measurement.
Step 2 – Work on the Bottom Shelf
Next, build on the bottom shelf using ¾-inch PHs/1 ¼-inch PH screws in the center. Afterward, drill ¾-inch PHs all over the outer edges, connecting to the bottom shelf.
Step 3 – X Braces
Connect cut and build X braces, attaching in place. The purpose of the X braces is mostly for decoration, which means that there is no need to get them extremely screwed and secured in place. Some screws and good glue will secure this part.
Step 4 – Complete the Top
For the top part of this coffee table, it is recommended to build the entire top using 1-1/2-inch pocket holes, as well as 2-1/2-inch pocket hole screws. This should be done on a flat and level surface. Then, attach the finished top to the base.
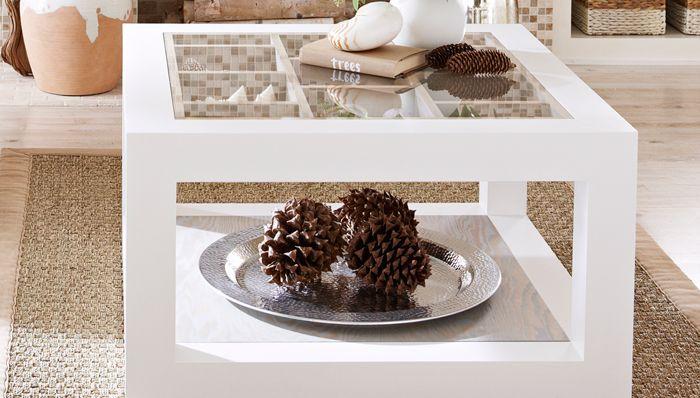
2. Display Coffee Table
What You Need
- Drill and bit set
- Countersink
- Table saw
- Sander and discs
- Kreg pocket-hole jig
- Sanding block
- Sandpaper
- Plywood
- Poplar boards
- Pocket screws
- Wood glue
Step-by-Step Instructions
Step 1 – Side Frames
- From the 1×4” poplar, cut (8) frame styles, (2) short frame rails for the bottom, and (2) long frame rails for the bottom. From the 1×3” poplar, cut (2) short frame for the top rails, and (2) long frame for the top rails.
- With a pocket-hole jig, start drilling pocket holes at the edge of the rails. Pocket-screw and glue (2) short frames, and (2) long frames. Remove excess glue and allow to dry. Sand the frame joints to ensure a smooth surface.
- Assemble the sides with clamps, measuring the distance of the bottom rails from both directions. There may be a need to cut the bottom shelf to fit in between the drill pocket holes and bottom rails. Sand the upper part with sandpaper, and wipe clean. You can apply a single coat of stain and allow it to dry. Apply two more coats with a clear finish.
Step 2 – Add the Upper Shelf and Inner Legs
- Measure starting from the bottom shelf and into the side of the top rails, cutting the inside legs to the right length.
- Test to fit the inner legs. Glue the inner legs into the frame stiles at every corner and allow to dry.
- Measure the distance from the top rails, cutting the upper shelf to allow for the opening to fit. Drill pocket holes in the right position. Sand and wipe clean. Apply stain to the top, matching the lower shelf, and allow to dry.
- Place the top shelf into a lower position in between the top rails until they rest on the inner legs. Attach the shelf to the upper frame rails using a pocket screw.
Step 3 – Build and Assemble the Top Frame
Cut the tray in front and at the back, preparing long and short dividers. Cut the middle dividers at about 1 inch oversize.
Step 4 – Apply Finish and Complete Assembly
Sand the entire table to finish, filling exposed gaps using paintable caulk. With 180-grit sandpaper, soften sharp edges on the frame and legs. Wipe the area using a soft cloth to make it clean.
Conclusion
Following the abovementioned DIY plans and guides on how to build a coffee table will not just allow you to come up with a functional table that will add spice to your interiors. It will also allow you to explore your creativity, giving you a sense of satisfaction in knowing that you can create one without relying on the readily available options out in the market. Share with us your coffee table and other woodworking projects. We would love to hear about it in the comments section. Feel free to share this article if you like!
Leave a Reply