Have you ever wondered how to build a drawer with slides? If you have the right materials and the best tools handy then you can start building one right away. You just need to follow a few simple steps. Let’s begin.
You need the following materials
➡ ¾- inch and ¼ -inch plywood or you may use solid wood
We recommend pressure-treated plywood to ensure that your drawer cabinets last a long time. Pressure treatment prevents moisture and pest damage and can also avoid warping and dents during severe climate conditions.
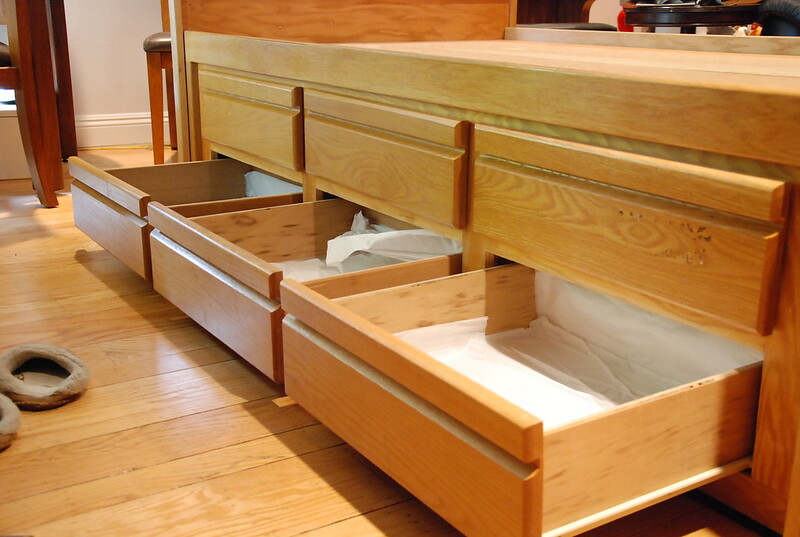
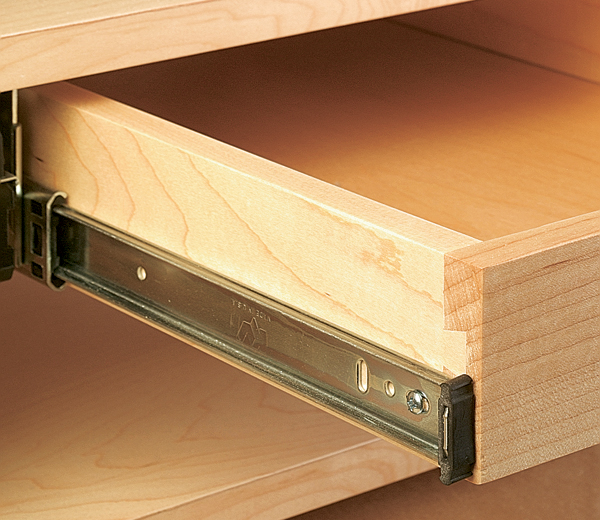
➡ Full-extension side-mount drawer slides or ¾ – inch extension bottom mount slides
These are the most popular drawer slides variety and are readily available in most hardware stores.
➡ 1 ¼ -inch pocket screws
This type of screw is used to make pocket hole joints. These create a tight and very strong joint which is important in making drawers and cabinets.
➡ ¾-inch finishing nails
Finishing nails offer a better hold especially when you’re working on thicker materials like wood for baseboards and cabinets.
➡ Wood glue
You need wood glue to make a strong bond between the wood pieces.
➡ Pocket hole jig
This tool will help you drill your pocket holes more accurately.
➡ Table saw or a circular saw
A table saw or a circular saw will help you cut faster and more accurately. Always make sure to use the correct type and size of the saw blade.
➡ Miter saw
This saw will help you cut at different angles.
➡ Nailer gun or a hammer
You can use a nailer gun to save you time but you may use a hammer if you don’t have this tool.
➡ Tape measure, pencil, carpenters square
➡ Safety gear
Always wear your safety gear when you’re working with wood and using power tools. You must have a face mask, work gloves, goggles, and earbuds. Always work in a well-ventilated and well-lit area.
Instructions
1. Measure the drawer height
Measure the height of the drawers by taking the height of the opening. Use your tape measure to take accurate measurements. Usually, the rule is to subtract about 1 to 1 ½ inches from the measurement to get the best results.
2. Cut the different parts
Now, cut the ¾ – inch plywood to create the correct width. Rough cut the wood to size according to the measurements you will get later.
3. Check drawer sides to the drawer slides
You will now cut your drawer sides to the correct sizes. How deep the drawers are will be according to the size slides that you will utilize for this project.
The best kind is a full-extension drawer slide. Cut your wood for the drawer side according to the length of the slide you want to use. Use a miter saw equipped with a stop-block track to make fast, repeated cuts.
4. Determine the drawer opening
Now, measure the drawer opening by taking the width of your opening and subtracting the space required by the drawer slides. This is usually ½ inch for each slide for one inch total. The fronts and back of the drawers are in the middle of the sides so you need to consider these as well. For a 1x wood with a full ¾ inch then you must take away 1 ½ inch.
Set the miter saw to stop block at the full width of the drawer so you don’t have to deal with fractions. You can use scrap pieces of the same plywood as spacers to control the stop block.
5. Cut the drawer front and back
When the spacers are in place, you may now cut the front part and the back parts of the drawer. Cut these according to the exact length that you need.
6. Make pocket holes
You will join the back and the front to the sides of the drawer using pocket hole screws. You need a pocket hole jig to create 3 pocket holes located at the outside parts of the drawer at the front and at the back.
7. Assemble the drawer boxes
Once the pocket holes are ready, use a clamp to hold the back and the front to the side of the drawer. The clamp will hold the walls of the drawer as you install the pocket hole screws to the openings.
8. Measure and cut bottoms
Once you’ve installed the sides, front, and back of the drawer, all you need to do is to connect the frame to the bottom. Simply measure the width and the depth of the drawer and cut the ¼ inch plywood panel accordingly. Use only a small amount (use “beads” of glue) of wood glue on the bottom part of the frame to connect the bottom.
Place the bottom of the drawer in the correct position and use a nail gun or a hammer to attach it. Remember to keep the nails ½ inch away from the outside area of the drawer.
9. Add the drawer fronts
Depending on the actual design of the drawer furniture, make drawer fronts to attach your box. You can choose from insert drawers or overlay drawers.
Insert drawers that will fit inside your drawer opening while overlay drawers will have the false front sitting on top of the opening. And for the finishing touches, add a drawer pull. You can go for a simple handle or a fancy knob depending on the design of the drawer furniture. Don’t forget, paint or varnish the drawers first before adding the drawer pulls.
If you want to paint or varnish the surface of the drawers, sand the surface first and make sure this is perfectly smooth. Apply a coat of paint, wait for it to dry, and apply another coat. Protect the surface with a good sealant.
Now that you know how to build a drawer with slides, you can now DIY drawers for your kitchen, bedroom, or storage room. Experiment with different drawer styles and use a variety of materials and tools. You’ll be a pro in no time.
Leave a Reply