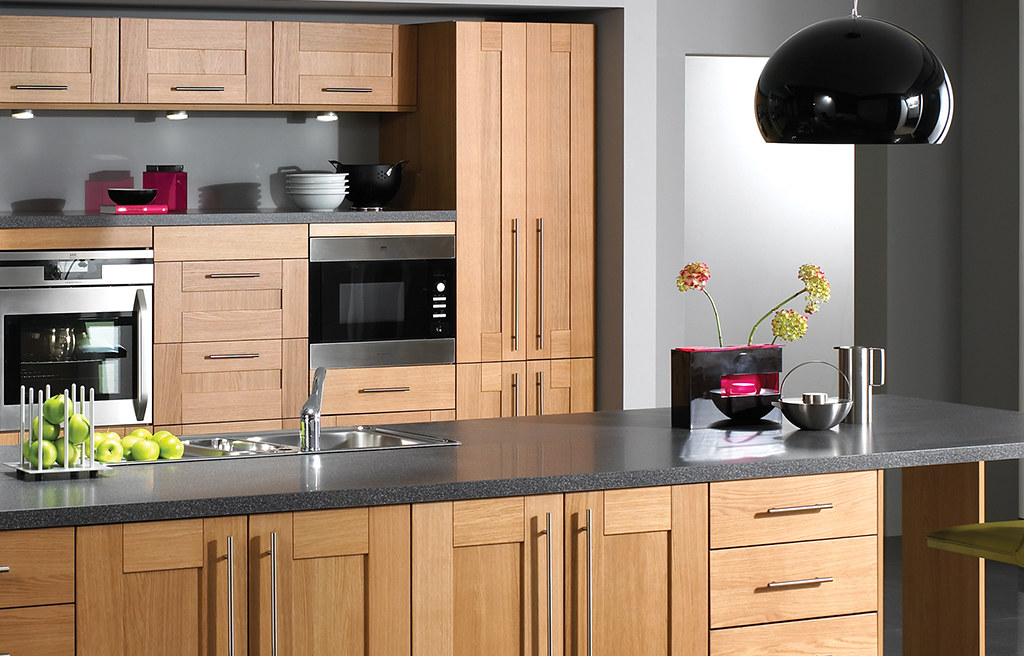
If your oak kitchen cabinets are looking exhausted and worn, tackling the refinishing process is as crucial as giving them a new lease on life, much like a painter restoring an old canvas.
In this guide, titled “How to Refinish Oak Kitchen Cabinets,” we’ll walk you through the process step-by-step.
Our expert tips and instructions will help you achieve professional results. From prepping the surfaces to applying the final coat of finish, we’ll cover everything you need to know to transform your oak cabinets and breathe new life into your kitchen.
Key Takeaways
- Thoroughly clean and prep cabinets for refinishing.
- Carefully remove and maintain hardware during the process.
- Sand and refinish surfaces for a smooth and even finish.
- Update cabinet hardware and doors for a refreshed look.
Preparing the Cabinets
Guarantee thorough cleanliness of the oak cabinets by eliminating dirt, grease, and grime buildup before moving forward with the refinishing process.
To achieve a flawless outcome, meticulously scrub the surfaces using a gentle wood cleaner or a mixture of vinegar and water.
Pay special attention to crevices and corners where residue tends to accumulate. Confirm that all surfaces are completely dry before proceeding to the next step.
Inspect the cabinets closely for any stubborn stains or sticky residue that might require extra attention.
Utilize a degreaser for particularly greasy spots, and a soft-bristled brush to gently scrub away any grime.
Remember, the key to a successful refinishing project lies in the preparation phase.
Take your time to validate that the cabinets are spotless and free from any contaminants that could affect the new finish.
Removing Cabinet Hardware
To begin removing cabinet hardware, use a screwdriver to carefully unscrew knobs and pulls.
Keep screws organized in labeled bags to ensure a smooth reassembly process.
Utilize a putty knife to gently pry off hardware, preventing damage to the cabinets during removal.
Unscrewing Cabinet Knobs
When beginning the process of refinishing your oak kitchen cabinets, carefully use a screwdriver to unscrew each cabinet knob from its place.
Turn the screw counter-clockwise to loosen it and remove it from the cabinets.
Make sure to keep the screws organized in a safe container to prevent misplacement. Gently pull the knobs away from the cabinets once the screws are detached.
It’s important to confirm all knobs are unscrewed before moving forward with the cabinet refinishing project.
By paying attention to detail and precision during this step, you set the foundation for a successful cabinet makeover.
Removing Drawer Pulls
With meticulous care, carefully unscrew the screws holding the drawer pulls in place using a screwdriver, ensuring precision in each turn to detach them smoothly from the cabinets.
Keep the screws organized to facilitate easy reattachment of the drawer pulls later. Remember to place the screws in a labeled container or bag to avoid misplacement.
When pulling the drawer pulls, do so gently to detach them from the cabinets without causing any damage.
Before reinstalling them for a refreshed look, take the time to clean and polish the drawer pulls.
This attention to detail in removing and maintaining the drawer pulls will contribute to the overall quality of your cabinet refinishing project.
Detaching Door Hinges
Carefully unscrew the hinges from the cabinet frame using a screwdriver, ensuring meticulous precision to detach them smoothly for refinishing.
When working on oak cabinets, attention to detail is essential to avoid damage. Keep the screws organized to facilitate the reattachment process later on.
Remember to place the hinges in a secure spot to prevent misplacement or harm during the refinishing of your oak kitchen cabinets.
Proper alignment is key when reattaching the doors post-refinishing to ensure they function correctly.
By handling the door hinges with care and precision, you set the stage for a successful cabinet refinishing project that will enhance the beauty of your oak kitchen cabinets.
Sanding down the Cabinets
To achieve a flawless finish on your oak kitchen cabinets, meticulously sanding down the surfaces is essential. Sanding oak cabinets helps remove the old finish and prepare the surface for refinishing.
Utilizing fine-grit sandpaper is important to ensuring a smooth and even finish on the cabinets.
This meticulous sanding process eliminates imperfections, scratches, and blemishes from the cabinets’ surface, providing a pristine base for the new finish.
Proper sanding technique is important for achieving a professional and durable refinishing outcome.
Applying Wood Stain
For impeccable results, meticulously apply the chosen high-quality wood stain in thin, even coats on your oak cabinets, ensuring vital thorough coverage and absorption.
Select a wood stain specifically designed for oak wood to enhance the natural beauty of the grain.
Begin by stirring the stain thoroughly to ensure an even consistency. Using a clean brush or rag, apply the wood stain along the wood grain to vital streaks or uneven coloring.
Allow each coat to dry completely before applying additional layers to achieve the desired richness of color.
Take into consideration the final look you want to achieve when choosing the stain color and finish.
By applying the wood stain with precision and care, you can revitalize your oak kitchen cabinets, bringing out their warmth and character.
Remember, the key is in the details so take your time and enjoy the craftsmanship of enhancing your oak cabinets with a high-quality wood stain.
Adding a Sealant Coat
When considering adding a sealant coat to your oak kitchen cabinets, remember to carefully select the appropriate sealant for your desired finish.
Confirm you apply the sealant evenly to protect the wood effectively.
Allow ample time for the sealant to dry properly, guaranteeing a durable and long-lasting finish.
Choose Appropriate Sealant
Consider using a high-quality polyurethane sealant to enhance the durability and protect the beauty of your oak kitchen cabinets. Opt for a water-based sealant if you desire a clear, non-yellowing finish that will accentuate the natural beauty of the oak.
When applying the sealant, make sure that each coat is thin to avoid drips or inconsistencies in coverage.
Lightly sanding the cabinets between sealant coats will result in a smooth and professional finish. Remember to allow ample drying time between coats for the best results.
Apply Sealant Evenly
To achieve a flawless finish on your oak kitchen cabinets, make sure the sealant is applied evenly in smooth, consistent coats.
Proper application of sealant is essential for protecting your oak cabinets from moisture and wear.
By ensuring an even layer of sealant, you enhance the natural beauty of the wood while providing a durable finish.
This meticulous approach not only safeguards against staining, warping, and damage but also results in a smooth and consistent protective coating on the oak surfaces.
Remember that sealants come in various finishes, like matte, satin, or gloss, allowing you to choose the one that best complements your oak cabinets.
Take your time and apply the sealant meticulously for a professional and long-lasting result.
Allow Proper Drying Time
Are you allowing the proper drying time after applying a sealant coat to your oak kitchen cabinets?
Once you have applied the final coat of stain or paint, it’s critical to let the cabinets dry for a minimum of 24 hours before adding the sealant.
This drying time is essential to guarantee that the previous layers have cured sufficiently, preventing any smudges or marks on the final finish.
Remember that humidity and temperature levels can impact drying time, so make sure the conditions are ideal for the sealant coat to set correctly.
Using a high-quality sealant will help protect the new finish from wear, moisture, and damage, ensuring a long-lasting and durable outcome.
Allow the sealant coat to dry completely before reinstalling cabinet hardware and using the cabinets for the best results.
Installing New Hardware
When updating your oak kitchen cabinets, carefully select new hardware that complements both the style and color of the cabinets to achieve a cohesive and refreshed look.
Choose hardware that enhances the overall appearance and functionality of your cabinets.
Consider replacing pulls with knobs or handles to give your cabinets a contemporary update.
It’s important to match the hardware finish with other fixtures and appliances in your kitchen for a harmonious design.
Select hardware styles that align with your desired modern or traditional aesthetic to create a cohesive look throughout the space.
Upgrading your cabinet hardware is a simple yet effective way to breathe new life into your kitchen.
Make sure that the installation of the new hardware is precise and aligned to maintain a polished and professional finish.
By paying attention to the details of your hardware selection and installation, you can elevate the visual appeal of your oak kitchen cabinets significantly.
Reattaching Cabinet Doors
How do you guarantee that your cabinet doors are securely reattached for smooth functionality and a polished finish?
When reattaching cabinet doors, meticulous attention to detail is important for ensuring a seamless outcome.
Begin by inspecting the hinges on the cabinet doors for any signs of damage or wear. Utilize a screwdriver to tighten any loose screws on the hinges, as this will help maintain the stability of the door.
Prior to reattaching, carefully align the cabinet door with the frame to guarantee a perfect fit. Once aligned, secure the hinges back onto the cabinet frame using the existing screws.
Take the time to test the cabinet door to confirm that it opens and closes effortlessly after reattachment.
This meticulous approach guarantees that your cabinet doors aren’t only securely reattached but also function smoothly, providing a refined and polished look to your kitchen cabinets.
Adding Decorative Elements
Inspect the oak kitchen cabinets for opportunities to elevate their appearance by incorporating decorative elements such as crown molding.
Crown molding can add a touch of sophistication and elegance to your cabinets, enhancing their overall aesthetic appeal.
When selecting crown molding, make sure it complements the style of your kitchen and matches the existing decor for a cohesive look.
Opt for a design that isn’t only visually appealing but also practical regarding installation and maintenance.
Carefully measure and cut the crown molding to fit precisely along the top of the cabinets, creating a seamless and polished finish.
Use a miter saw to achieve clean and accurate angles for a professional result. Secure the crown molding in place using adhesive and finishing nails for stability.
Once installed, consider painting or staining the crown molding to match the cabinet finish or create a contrast that highlights its decorative nature.
By incorporating crown molding into your oak kitchen cabinets, you can elevate their design and transform the space into a stylish and refined culinary haven.
Cleaning Up and Finishing Touches
To achieve a professional finish, begin by meticulously polishing every cabinet hardware piece.
Next, carefully apply a protective sealant to shield the wood from daily wear and tear.
Polishing Cabinet Hardware
For an immaculate and refined finish, utilize a metal polish to rejuvenate and enhance the appearance of your oak cabinet hardware.
Begin by removing tarnish and grime using a soft cloth and the appropriate cleaning solution.
Make sure each piece is completely dry before reattaching them to the cabinets to achieve a polished look.
If you’re aiming for a cohesive aesthetic, consider updating the hardware finishes to complement the new look of your cabinets.
Don’t overlook the small details like screws and hinges; polishing these elements meticulously can bring about a complete transformation in the overall appearance of your cabinets.
Paying attention to these finer points will result in a fresh and polished finish that elevates the entire space.
Applying Protective Sealant
To guarantee the lasting beauty and protection of your refinished oak kitchen cabinets, meticulously apply a high-quality protective sealant as the final step in your refinishing process.
The protective sealant plays an important role in enhancing the durability and longevity of your cabinets by creating a barrier against moisture, stains, and daily wear and tear.
Choose a sealant that complements the natural beauty of oak wood and opt for a finish—be it matte, satin, or glossy—that aligns with your aesthetic preferences.
Follow the manufacturer’s instructions diligently, ensuring proper application and allowing for adequate drying times.
A well-applied protective sealant not only safeguards your cabinets but also accentuates their appearance, providing a smooth and easy-to-clean surface for years to come.
Organizing Cabinet Interiors
After applying the protective sealant to your refinished oak kitchen cabinets, the next step is to focus on organizing the cabinet interiors with meticulous attention to detail and precision.
Utilize drawer dividers and organizers within the cabinets to separate and categorize items effectively for easy access.
Enhance storage space by installing pull-out shelves or lazy Susans, which not only maximize space but also improve the visibility of stored items.
Consider adding under-cabinet lighting to illuminate dark corners, making it easier to organize and access items.
To keep the cabinet interiors clutter-free, use clear storage containers or bins for smaller items.
Implementing a labeling system will help you quickly identify the contents and maintain a well-organized interior of the cabinets.
Maintaining the Refinished Cabinets
When maintaining the refinished oak cabinets, make sure to regularly wipe them down with a damp cloth to remove dust and maintain cleanliness.
For the upper cabinets, pay close attention to the areas near the ceiling where dust tends to accumulate. Use a gentle touch when wiping to avoid damaging the new finish.
To protect the cabinet surfaces from moisture or heat damage, utilize coasters or placemats, especially in areas where cups or hot dishes are frequently placed.
Harsh chemicals and abrasive cleaners should be avoided, as they can strip the new finish from the cabinets. Instead, opt for mild cleaning solutions recommended for wood surfaces.
Every 6-12 months, apply a protective coat of wax or natural oil to keep the cabinets looking fresh and to provide an extra layer of protection.
Following the manufacturer’s guidelines for specific care instructions is important to ensure the longevity of the refinished oak cabinets.

Leave a Reply