One of the basic woodworking power tools is the woodworking router. A router can create fancy edges on wood, can cut different patterns, rabbets, and dadoes creating a flawless, professional look on projects. Learn how to use a router and find out all the awesome things you can make with wood. Let’s start by learning all about the different parts of a woodworking router.
Woodworking router parts

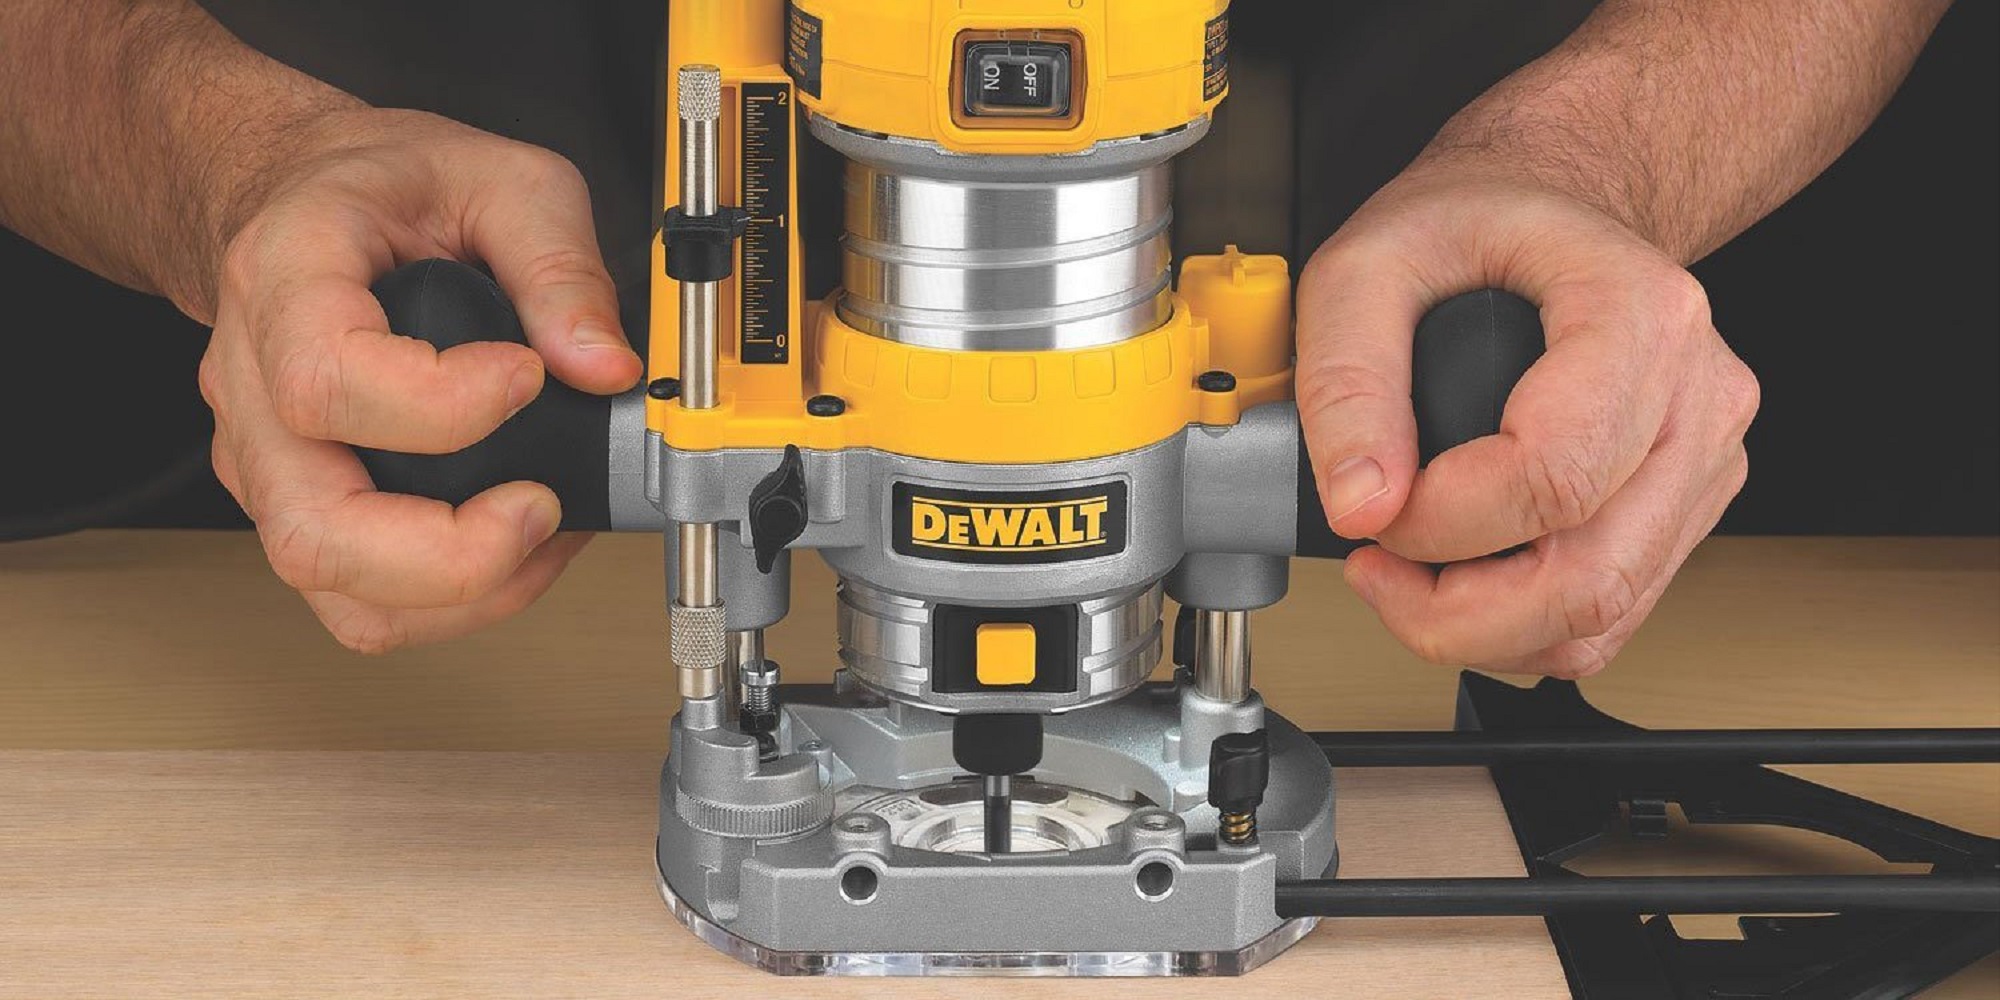
- Router motor
Router motors are vertically mounted with a spindle attached to a collet. The spindle is encased in housing for added safety. There are many types of router motors and like most power tools, the type will determine its power and voltage and how the router may be used.
Routers with 230 to 240V motors are often used in home workshops. Meanwhile, 110 to 115V routers are common in worksites and commercial establishments.
- Collets
This is found along the end of the spindle. It has a locking nut that’s tightened to hold the shank of the bit or router cutter. Collets rotate when the router is working to move the cutter and cut wood. The size of the collet depends on the shank size that it accepts.
- Router base
The bottom part of a router is the base. The base has a hole at the center where the cutter is seen. A fixed-based router has a base and the top of the router connected therefore there is no plunging.
Meanwhile, the sub0base keeps the workpiece safe from scratches from the main base. There are many accessories that you can fix on the base to improve the router’s capabilities.
- Speed control dial
Speed control is found in variable speed routers. This allows you to adjust the speed of the router according to your needs. The speed is measured in rotations/revolutions per minute. Read the router specs to find out the minimum and maximum speed of the tool.
- Depth stops
The depth stop sets the cutter height and also the depth cut. This is locked to keep the depth consistent.
- Dust extractor spouts
This port is connected to a vacuum nozzle or dust extractor to easily remove dust and dirt away from your workpiece.
- Router handles
The router handles are found on each side of the router tool. You will hold onto these handles to keep the router in place as you work on your wooden piece.
Different woodworking router techniques

The following are the most common woodworking router techniques:
- Edge routing
Edge routing is one of the most basic cutting techniques. Clamp your workpiece before you start working on it. Start with a clean and sharp bit moving it in a counterclockwise movement on the top of your workpiece. However, this won’t always come out perfectly as wood can chip along the corners and edges.
Climb cut a few inches from the end grain from the southwest and northeast areas of the workpiece. Begin anywhere running the router around in a counterclockwise pattern. If you are working on the inner edge of a piece like a picture frame, the movement should be in a clockwise manner.
You must always start by testing the router on a small piece of wood. This will make sure that you’re on the right cutting depth. Always remove only a small piece of wood at a time to avoid huge mistakes. Finally, sand the wood edges first to attain a smooth surface before you use your router.
- Edge routing with a narrow stock
Place a support board on the bench to hold the router in place and stop your board and keep it secure. You won’t need to clamp your wood when you start this way. You may also screw on a stop to your bench from the end of your board to avoid slipping. This gives you a wider surface to work on and reduces rocking and other forces that may affect the workpiece.
- Cutting dadoes
The first step is to clamp the workpiece with a straightedge. The 34-inch straight bit is perfect in milling dadoes to create a ¾ -inch cut in wood. If you’re working with plywood, use a 23/32 – inch straight bit.
Dadoes are another term for grooves. These allow you to seamlessly support all kinds of shelves along the sides of bookcases and cabinets. Always use a bit that corresponds to the needed dado width. This will allow you to make a simple cut in just a single pass. As always, test your cut using a piece of wood to make sure that you’re ready to go.
- Cutting rabbets
Another type of groove is rabbets. These are grooves cut through the back edges of a bookcase to re-set the plywood backing. These can help hide plywood edges to create a more professional look. Use rabbet bits to create rabbet cuts with the right width.
This bit needs the correct pilot bearing that will create grooves with similar thickness as your plywood. This will make the backflushed with the cabinet back.
- Pattern cutting
When you use patterns, you can make many copies of different shapes using your router attached with a flush-trim bit. You must use a perfect pattern, ones with well-detailed and smooth edges on plywood or particleboard.
Place the pattern on the stock wood using basic drywall screws but don’t let the screw shanks appear through the front area of the workpiece. If you’re working on an intricate pattern, you may not be able to move the router in one go. You may need to stop, remove or adjust the clamps and resume your work.
Learning about how to use a router properly will help you make use of this tool in a more efficient and safer manner. Always wear safety accessories and garments such as safety goggles, gloves, and earpieces. Read the manufacturer’s instructions on how to use the router model. And whether you’re working in your shop or workplace, use only compatible accessories with your woodworking router.

Leave a Reply